How do you build a fence step by step without gaps or leaning posts? First confirm the boundary and any permissions, choose your fence panels and fence posts, then measure the layout before you dig. Set the posts securely, install gravel boards where specified, attach the panels and finish any gates. This guide explains how to build a fence with practical checks at each stage, helping you avoid gaps, leaning posts and timber touching the soil.
Planning Your New Garden Fence
A successful fence installation starts with a clear plan for fence construction. Decide whether your garden fence is mainly for privacy, security, screening or keeping children and pets within the garden. Measure the available space and consider how your fence will meet the house, gates and other boundary features. Before buying materials, record the height, panel width and post size, including any gravel boards or trellis. Planning these details together makes building more predictable and reduces unnecessary cutting.
Check who owns the existing fence before you remove it. Do not dismantle another person's fence or use their fence posts as supports without agreement. Where removal is appropriate, unscrew reusable fittings, remove loose nails and take down panels carefully. Old concrete around fence posts can be heavy and difficult to extract, so include disposal, equipment and access in your plan.
Discuss the work with your neighbours, including any access needed to their garden. Agree where materials will be stored and how plants, shrubs and paving will be protected during installation.
Check whether you need planning permission before you build a fence, especially in a front garden beside a road, around a listed building or where local restrictions apply.
Do not assume that every two-metre fence is permitted everywhere. The rules depend on location, the total finished height and restrictions affecting the property. Confirm the position with the local planning authority if there is any uncertainty. Plan a fence that fits the site before you order panels, fence posts or gates.
Choose a spell of workable weather rather than relying on a fixed season. Early spring or late autumn may suit some gardens, but frozen ground, saturated soil and strong winds can make building unsafe or compromise the installation. Check nearby vegetation for active bird nests before cutting or clearing; postpone work that would disturb a nest. Prepare a clear route for moving panels and protect plants that will remain.

Choosing A Fence Type For Your Garden
The right fence depends on the setting and the result you want. A solid panel fence gives more screening, while slats, pickets and trellis allow light and views through. Fence panels come in different widths, heights and construction styles; check the actual dimensions rather than assuming every panel fits the same opening. Match posts, brackets and gravel boards to the selected system.
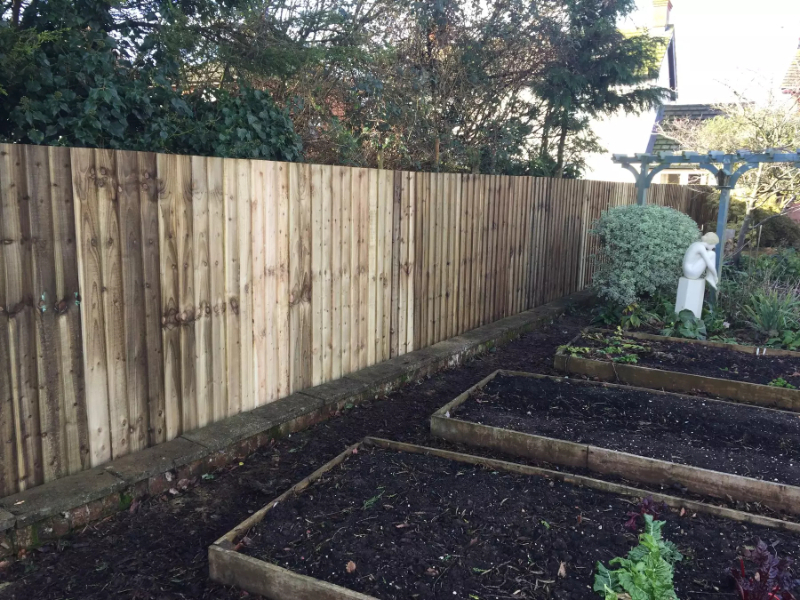
Wooden panel fencing is a common choice for a private back garden. A wooden fence can also suit a front boundary when the height and design are appropriate. Wooden posts need a treatment suitable for their use. Pressure treated timber offers protection suited to its treatment specification, but cutting exposes fresh wood that may need an approved treatment. The style should complement your home without blocking necessary sight lines or making access awkward.
Compare the following options before deciding how to build a fence for your property. Each needs a different approach to supports, fixing and maintenance.
Gabion Boundaries
Gabions are wire baskets filled with suitable stone, creating a substantial boundary rather than a conventional panel fence. Their weight means the foundation, basket specification and stability need careful design. Rocks piled into an unsuitable basket are not a substitute for a properly constructed system. Gabions can be a great option in the right location, but substantial or retaining installations should be assessed by an experienced specialist.
Chain Link And Wire Fencing
Chain link provides a visible boundary while letting light and air through. It requires suitable posts, straining hardware and a method of tensioning the mesh; the process is different from putting up fence panels. Choose a specification that suits the intended use, and protect sharp cut wire ends. Wire fencing can be useful beside planting, but it will not provide the same privacy as closely fitted timber boards.
Are you considering garden fencing installation or replacement?
MD Fencing & Decking work throughout Hertfordshire and Buckinghamshire, covering the A10 corridor from the start of the M25 up into Buntingford. Our services also cover Milton Keynes and nearby areas including:
Timber Panels, Rails And Pickets
Timber gives you a choice between ready-made fence panels and a fence constructed from rails and individual boards. A panel fence is assembled in bays between posts. Picket fencing uses spaced pickets attached to horizontal rails, while closeboard designs use overlapping boards. Do not buy separate rails for framed panels unless the manufacturer's system requires them. Knowing which method you are building prevents wasted materials and mismatched fittings.
Select wood and fixings suited to outdoor use. Treat exposed cut ends with compatible wood preservative when the timber supplier recommends it. Paint or stain can provide a decorative finish, but do not apply stain over paint unless the products are designed for that combination. Protect the lower timber from persistent moisture and keep plants from covering the base, where hidden dampness can contribute to rot.
Fencing Alongside A Hedge
A hedge can soften a fence and provide shelter, although growing plants takes time and regular maintenance. Leave enough space to reach the fence posts and inspect panels. A new fence placed tightly against mature roots can be difficult to install, and excavating through major roots may harm the plants. Consider the final width of the hedge rather than its size on the day of planting.
Keep shrubs from pressing against fence panels and avoid letting climbing plants add excessive weight. Check vegetation for nesting birds before clearing it, and plan planting around maintenance access. If you need a secure boundary immediately, a hedge alone may not meet that need. Where practical, combine appropriate fencing with planting instead of relying on growth to close a large gap.

Wire Fencing

Hedges And Planting
Do You Need Planning Permission To Build A Fence?
In England, Planning Portal guidance generally allows a fence without planning permission when it does not exceed one metre beside a highway used by vehicles, including its footpath, or two metres elsewhere. Other conditions also apply. Measure from ground level and include additions such as trellis when checking the finished height. You may need planning permission if the proposed fence falls outside those conditions.
Restrictions can apply around listed buildings, where permitted development rights have been removed or where planning conditions affect a property. Conservation-area rules may also affect removal. Contact your local authority or local planning authority for guidance specific to the site. A planning decision does not settle ownership or allow you to move a property line.
Speak to neighbours about the boundary and any shared work, but distinguish their agreement from planning permission. Check relevant deeds, covenants and estate conditions as well. There is no universal garden-fence building permit that replaces these checks. Resolve uncertainties before ordering tall posts or building a boundary that may need to be altered.
What Recent Weather Figures Mean For Your Fence
The Met Office's State of the UK Climate 2025 report, published on 15 July 2026, found that October-to-March rainfall during 2016-2025 was 13% higher than during 1961-1990, and 3% higher than during 1991-2020. The same report says occurrences of very wet winter-half-year months, with twice the 1961-1990 average rainfall, have approximately doubled in 2016-2025 compared with 1961-1990. These are UK-wide figures, rather than a forecast for an individual garden. Read the Met Office report summary.
For fence building, the practical lesson is to plan for drainage and repeated wetting. Fence posts need suitable foundations, and timber fence panels need separation from persistently damp ground. Avoid burying the panels or heaping soil against gravel boards. Check where rainwater collects before you choose the base detail. Gravel boards can protect the panels, but they cannot make an unsuitable foundation stable. On an exposed site, have the supports and wind loading assessed before building begins.

How To Build A Fence: The Practical Sequence
To build a fence reliably, work through the layout, supports and fixing method in order. A small panel fence on flat ground can be fairly easy for someone with sound DIY skills and a helper, provided the site presents no unusual difficulties. Large gates, unstable ground, difficult access or an exposed site can make professional installation the better choice. The posts carry the load, so their specification matters as much as the appearance of the panels.
The following steps explain how to install a fence using timber panels, with notes for rails and pickets where the method differs. Keep the manufacturer's instructions to hand. At every step, check alignment before moving on; making sure the first bay is correct is easier than correcting several posts after the concrete has set.
1
STEP 1: CHECK THE BOUNDARY AND ACCESS
Step 1 is to confirm where the fence belongs. HM Land Registry explains that most title plans show general boundaries rather than the exact legal boundary. Do not treat a thick line on a small plan as a precise measurement for fence posts. Review the deeds and existing features, and seek advice where ownership or the property line is disputed. A marked boundary agreed on site is more useful for setting out than an assumption.
Walk the route with a tape measure and identify gates, corners, changes in level and areas where the fence meets another structure. Mark the proposed position on your own side of the boundary. Check that fence posts, concrete foundations and projecting fittings will remain within the space you are entitled to use. Building just beyond the boundary can cause a dispute even when the fence looks straight.
Before finishing step 1, discuss working access with your neighbours and decide how to protect paving and planting. If an old fence will be removed, establish who will remove the panels and deal with the old fence posts. Do not start building while the boundary remains uncertain. Resolve it first, then prepare the layout and materials.
2
STEP 2: SELECT PANELS, POSTS AND FIXINGS
Step 2 is choosing a complete fencing system. Match fence panels to compatible posts, gravel boards and fittings rather than selecting each part separately. Wooden fence posts need timber suitable for ground contact where they will be buried. Concrete or other specified posts have different fixing methods. Framed panels, featheredge boards and lightweight trellis are not interchangeable; the supports must suit their weight and wind exposure.
At the end of step 2, note the actual panel width, finished height and required clearances. Adding gravel boards or trellis can mean you need to install longer fence posts, but longer posts alone do not guarantee adequate strength. For a panel fence, confirm whether panels slot into the posts or attach using fence clips or brackets. Choose exterior-rated screws or nails that the manufacturer approves.
3
STEP 3: MEASURE AND MARK THE FENCE LINE
Step 3 turns the plan into a measured fence line. Use a tape measure to record each straight run, then mark both ends with stakes or bamboo canes. Use markers that do not penetrate unchecked ground; only drive stakes after confirming the position is safe. Stretch a string line between them without obstructing paths. Mark where the centre of each post will sit, allowing for post width and the fitting system. Fence panels may be described as six feet wide, yet the precise width can differ. Measure the panels you will actually install.
Subtract the openings for gates before dividing the run into bays. A timber batten cut to the correct length can help you check the opening between fence posts, but confirm whether the system specifies clear spacing or centre-to-centre spacing. Mark corners separately. Framing battens used as measuring guides should not be confused with structural rails. Repeat the measurements before you mark the remaining posts.
Before completing step 3, check the final bay and the last post position. A short remaining opening may need a reduced-width panel, repositioned bays or a different layout. Do not force panels into undersized gaps or spread fence posts farther apart than their system permits. Put bamboo canes at the proposed post centres, then check the line from both ends, making sure the gates will open without catching the ground.
Worked Example: How Many Panels And Posts Are Needed?
Suppose your measured boundary can accommodate five equal bays of 1.8 metres between the faces of six 100mm-wide fence posts. The clear openings total 9 metres, but the overall length is 9.6 metres when the post widths are included. You would need five fence panels and six fence posts for that straight run, with no gates or corners. If each bay uses one gravel board, five gravel boards are needed. This is an illustration; substitute the actual dimensions of your chosen panels and posts.
A five-panel fence does not need five posts: both end panels need an outside support, while neighbouring panels share intermediate fence posts. Check whether the supplier states clear bay width or the distance between post centres. For this example, intermediate centre spacing is 1.9 metres. Divide the usable length only after allowing for posts and gate openings, making sure the final bay can be constructed with a suitable panel.
The familiar descriptions six feet and eight feet are nominal sizes, not a substitute for measurement. Six feet equals about 1.83 metres and eight feet about 2.44 metres. A panel sold as 1.8 metres wide differs from one measuring six feet. That small difference adds up across several panels. Measure the width, thickness and height before you purchase, then mark the fence posts from the actual specification rather than a general rule.
4
STEP 4: PREPARE THE TOOLS AND MATERIALS
Gather all the tools before building starts. To dig holes, mark timber and fit panels, the right tools normally include a post hole digger or narrow shovel, hammer, saw, power drill, suitable drill bits, spirit level, tape measure and a pencil for marking. Have temporary supports, a bucket and trowel available where appropriate, plus the specified concrete mix if the posts will be concreted in. Check power tools and extension leads before use. Wear protective gloves and safety glasses, with any additional protection required for cutting, dust or noise. The items below should be matched to your chosen system.
Post hole digger or narrow spade
Hammer and suitable saw
Specified corrosion-resistant nails
Concrete mix or specified post mix
Spirit level and string line
Clamps and temporary timber supports
Post caps or compatible end caps
Step ladders where appropriate
Power drill and suitable drill bits
Fence panels and gravel boards
Tape measure and marking pencil
Exterior-rated screws and brackets
Fence posts suited to the site
Compatible cut-end wood treatment

Locate Underground Services Before You Dig
HSE guidance describes three essential parts of safe excavation: planning the work, locating and identifying underground services, and safe digging. Underground pipes and cables may cross a garden even when nothing is visible above ground. Obtain relevant service information and arrange detection by someone competent to use the equipment and interpret the results. Service plans alone do not establish the exact route or depth. See HSE guidance on underground cables.
Do not drive stakes, bamboo canes or an auger into an unchecked area. If pipes or cables could be affected, get competent advice about how to dig safely or reposition the fence posts. Power tools and mechanical digging equipment need appropriate training and clear working space. Remove trip hazards and keep people away from open holes. Cover or guard unattended holes, and keep excavated material from falling back inside.
5
STEP 5: DIG POST HOLES AND SET THE POSTS
Only dig post holes after the underground-service checks described below have been completed. Mark the first post hole and dig to the dimensions specified for your fence posts and site. Use a post hole digger to remove loose material from the base. Check the depth rather than guessing from the amount of soil removed. The holes must allow the specified foundation to surround the posts; a narrow hole with insufficient concrete can leave fence posts unstable.
Place the first post in exactly the right place and use a spirit level to check two adjacent faces. It must be plumb, or perfectly vertical, in both directions. Prop it securely while you set posts using the specified method. Prepare each post hole so the base supports the post as designed. Where a gravel base is specified, follow the stated thickness and drainage detail; adding gravel to a waterlogged hole does not solve the drainage problem.
When mixing concrete, follow the product instructions for proportions and handling. Conventional concrete mix may be mixed before placing; some rapid-setting concrete products use a different sequence in the hole. Add water only as directed, and never substitute neat cement for concrete. Where the product requires you to pour concrete, do so around the supported post without moving it. Fill around the post as specified, check its position again and keep the supports in place for the required period. Let the concrete cure sufficiently before loading the fence posts with panels or gates.
Choosing Post Depth And Foundations For The Site
The depth of a post hole depends on the fence system, height, wind exposure and ground conditions. Wickes' general installation guide gives 450-600mm for its illustrated concrete-set post method, while noting that the manufacturer's instructions should be checked. That is a product-guide example rather than a specification for every fence. Tall fence posts, large gates and difficult ground can require a different foundation. See the Wickes installation guide.
Do not dig deeper holes simply because the ground feels soft. Soft ground, made-up ground and holes containing standing water may need a different foundation design. Longer fence posts allow a deeper embedment where specified, but they must also have the required strength. If the site assessment calls for deeper holes, confirm the post length before buying. A shallow post hole cannot be made adequate by adding extra concrete above ground.
When you dig a hole, check its width and depth before setting the post. If you dig a hole beside an old footing, remove unsuitable loose material and have the foundation detail assessed rather than resting new fence posts against broken concrete or bricks. Keep the other fence posts aligned as you work along the string line. Recheck all the posts before the concrete begins to set, making sure none has moved while you filled the next post hole.
Mixing concrete introduces a separate safety risk. HSE warns that wet cement can cause chemical burns, particularly when trapped against skin or inside boots and gloves. Wear suitable waterproof protective gloves and other protection specified for the product, keep contaminated material off your skin and follow its handling guidance. Do not kneel in wet concrete. Read HSE's cement advice before using it.
6
STEP 6: FIT GRAVEL BOARDS OR STRUCTURAL RAILS
For a panel fence, install gravel boards before you install fence panels, where the system uses them. Gravel boards help separate the timber panels from damp ground and protect their lower edge from splashback. Attach them to the fence posts with compatible clips, brackets or slots. Check their level and finished height, making sure the panels will fit above them without exceeding the planned fence height. Gravel boards are not a retaining wall for raised soil.
If you are building a fence from individual boards, attach the structural rails required by that design instead. The number, section size and position of rails depend on fence height and the manufacturer's specification. Attach horizontal rails to the fence posts using suitable fixings, making sure each screw or nail has the required engagement. Drill pilot holes where specified to reduce splitting. Timber battens and framing battens used for marking are not automatically suitable load-bearing rails.
Installing Fence Panels On Sloping Ground
A panel fence on a slope needs a layout suited to the change in ground level. Some fence panels can be stepped between posts; other systems can follow a slope only if designed to do so. Rigid framed panels should not be forced out of square. Plan each bay, making sure the posts provide adequate support at both sides and the finished height remains appropriate for the location.
Stepping panels can leave gaps underneath. Use compatible gravel boards or a purpose-designed detail to address those gaps rather than putting loose boards into wet soil. Where changes in level mean posts need additional exposed length, check their specification. Install gravel boards with the supporting detail required by the system; do not use them to hold back a raised garden bed unless they are designed for that load.
On flat ground, use a spirit level to establish the intended panel alignment. Mark the outer edge of the intended panel face so the fittings line up. On a slope, mark the planned tops of each bay rather than forcing every top onto one horizontal line. If using fence clips, fix them to the correct heights on both posts. Temporary packing may help support panels during fitting, but remove it when appropriate so the permanent installation does not depend on loose bricks or scraps of timber.
7
STEP 7: ATTACH PANELS OR PICKETS
To install fence panels between timber fence posts, support the panel at its intended height while a helper keeps it steady. Mark the fence clips or brackets in the positions specified for the panel. Attach the fittings with the recommended screw size, keeping the panel flush with the intended face of the posts. Some systems use L brackets; others use slotted posts. Do not assume that every panel can be fixed in the same way.
When you install fence panels in slotted posts, lift or slide them into place using the specified method and adequate help. For a built-up fence, attach pickets or boards to the rails instead. A spacer helps you repeat the intended gap between pickets, while pilot holes can reduce splitting near edges. Where you need access through panel fencing , plan a purpose-designed removable bay with secure fittings. Do not omit fixings to make panels easier to pull out. Attach every panel or board securely before moving on, and check alignment across the fence posts.
Fixings, Reduced-Width Panels And Trellis
Fence clips and L brackets must suit the panel thickness and support arrangement. Attach the bracket to solid timber with the approved screw size and required edge distances. Use a spirit level before final fixing, and check that each screw holds the fitting without crushing it. Nails can be suitable where specified, but do not substitute short nails for structural screws. Loose nails and incorrect brackets can leave panels rattling or insecure.
If a final panel needs cutting, first check that its construction permits trimming. Mark the cut with a pencil and support the panel on a stable workbench. Use the appropriate saw, keep hands clear and wear the protection required for the tool. After cutting, the panel may need a framing batten reattached to preserve its strength. Treat freshly exposed timber as directed, then attach the restored panel to the fence posts.
Trellis can add height and an open decorative finish, but confirm its support requirements and the total permitted height before fitting. Attach trellis using the specified brackets rather than balancing it on the tops of fence panels. Make sure the fence posts can support the trellis and any proposed climbing plants. Even lightweight trellis can collect wind load, particularly once vegetation grows through it. A removable trellis section still needs secure fittings.
8
STEP 8: INSTALL AND ADJUST THE GATE
Gates need supports designed for their width, weight and repeated movement. Fence posts sized only for panels may not be suitable gate posts. Check the manufacturer's hinge and latch specification before you install posts for gates. Mark the hinge positions and use temporary packing to hold the gate at the required height while you attach the hinges. Allow the specified clearances around the opening.
Check the swing before tightening every screw. The gate should clear the ground throughout its movement, including any rise beyond the opening. Drill where required, attach the hinges and fix the latch so it closes without lifting or forcing the gate. Heavy duty gates may require stronger foundations and fittings than other parts of the fence. Do not use the latch to compensate for leaning posts or a twisted frame.
Finally, operate the gates several times and check that all the posts remain stable. Making sure the fittings are secure now helps prevent movement later. Recheck the brackets, screw heads and any nails for sharp projections. Remove temporary supports only when the foundations have gained the strength required by the product instructions. If the gates sag or the posts move, stop using them and investigate the cause before making further adjustments.


Post Caps, Timber Treatment And Final Checks
Fit a post cap where the timber system recommends one. The post cap helps shed water from the top of a wooden post, but cannot guarantee that rainwater will never enter the wood. Choose a post cap of the correct size and attach it with the specified screw or nails. Do not hammer fixings so close to the edge that they split the timber. Check that each post cap is secure without obstructing a gate or trellis fitting.
Inspect the tops of the fence posts and any exposed ends of rails or boards. Cutting pressure treated timber can expose wood that needs a compatible cut-end treatment; follow the timber supplier's guidance. Some wooden posts have shaped tops and do not need separate caps. A cap does not repair damaged wood or prevent rot at the base. Proper foundations, drainage and suitable timber remain important to the life of the fence.
Before applying paint or stain, check that the wood is ready and that the product is compatible with the existing treatment. Do not soak timber in an improvised mixture. Follow the application, drying and maintenance instructions, and treat cut ends where required. Seal or finish exposed areas only with an appropriate product; sealing over damp or decayed wood will not restore its strength.
Walk both sides of the finished fence where access is available. Check the tops of the panels, alignment of the posts and every visible screw, nail and bracket. Remove waste, tools and temporary packing. Replant displaced plants only where their roots will not interfere with the foundations. Check gates again and arrange regular inspections, especially after storms, so loose fittings or early signs of rot are dealt with before the fence becomes unstable.
Common Fence-Building Mistakes And When To Get Help
Putting fence posts at a standard spacing without measuring the chosen panels is a frequent source of avoidable work. Another mistake is buying posts before deciding on gravel boards and trellis. Measure first, record the finished height and confirm how the panels attach. Making sure the parts belong to the same system reduces the chance of a last-minute gap or unsuitable fittings.
Do not load freshly set fence posts before their foundations are ready. Keep each prop and support in position for the period specified. A product that begins setting within minutes may still need more time before panels or heavy gates can be attached. Follow the stated loading and curing guidance instead of assuming that a firm surface means the entire foundation is ready.
Digging can be the hardest part of a DIY project, especially where old concrete, large roots or hard ground are present. Hire appropriate tools only if you can use them safely; otherwise ask an installer to handle that part of the job. Putting up large fence panels usually needs two people to lift and position them safely. A helper should not stand in an open hole or hold a panel while unsupported posts move.
Professional help is a good idea when the foundation design is uncertain, the boundary is disputed or underground services affect the proposed locations. It is also a good idea for heavy gates, substantial slopes and exposed sites. To install a fence well, the method must suit the materials and terrain. The result should be stable fence posts, secure panels and a finish that can be maintained without unnecessary difficulty.
Further Guidance On Planning And Boundaries
The planning section refers to Planning Portal guidance for fences, gates and garden walls. For general boundary information, see GOV.UK property-boundary guidance. Before clearing vegetation, consult the RSPB advice on nesting birds. These sources were checked on 2 October 2026.
Ready to build a fence around your garden in Milton Keynes or the surrounding area? MD Fencing & Decking can help you plan fence posts, panels, gravel boards and gates that suit your property. Our team also installs garden decking where you want to improve the wider outdoor space. Contact us to discuss the layout, materials and installation work needed.